
How to Use the Action Plan
What is the Action Plan?
The Action Plan is a to-do list designed to help keep track of the Assessment items your organization is working on.
Use it to prioritize, stay organized, and find relevant resources while you make changes at your organization.
How does it work?
The Action Plan pulls questions from Assessments and allows you to categorize them based on your priority. Each organization in the Action Center has one Action Plan. All team members of the organization can use it.
How do I find the Action Plan?
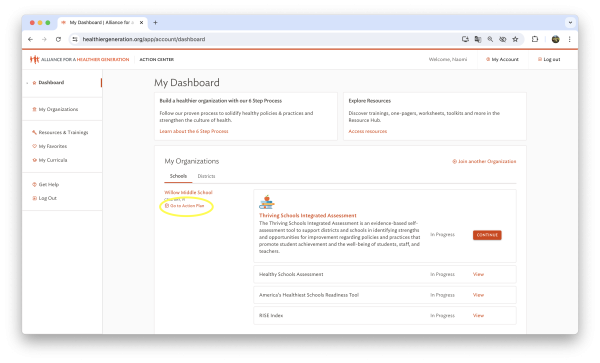
Once you have logged in to the Action Center and joined a school or district, you’ll be able to see the link for that school or district’s Action Plan.
On the Dashboard: Each organization you have joined will have a link to the Action Plan
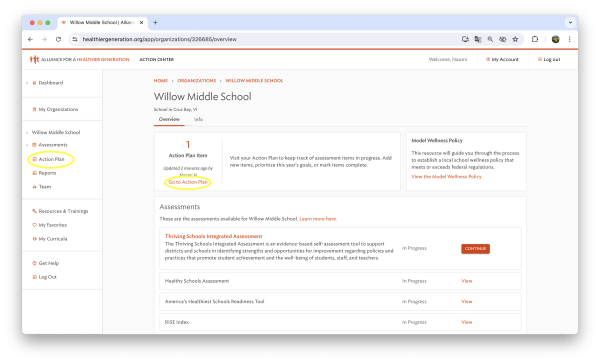
Once you’re viewing an organization:
- Link in left side bar
- Link in overview box
How do I use the Action Plan?
You can add items to your Action Plan one of two ways:
From the Assessment
You can add an item directly from an Assessment question in the top righthand box.

From the Action Plan
From the category column you want the item in, click Add item. Then choose which Assessment you’d like to select from. This will provide a list of all questions with their status and a checkbox. Check the items you want to add, then scroll to the bottom to click the Add selected items to the Action Plan button.

What are categories?
The columns are categories for you to sort your items into. Move items from one column to another based on its priority or status.
To move an item to another category, simply drag and drop. Click on the item and drag it to the category you want it to move to.
To work on Category
These are Action Plan items you will work on eventually but aren’t a current priority.
Items added from the Assessment will automatically go to this category. From there, then you can move items to the category they belong in.
This year’s goals Category
These are the Action Plan items you want to work on this year. To help focus your efforts, we suggest 2-5 items for this category. If an item is a priority for the current school year, move it to this category.
Done Category
When an item is done, move it to the Done category.
For instance, if an item requires ongoing maintenance, it may remain in the Done category without being marked complete.
Marking an item Complete
Marking an item complete will grey it out, letting you know its complete. It will stay in the category it’s in until you move or remove it from the Action Plan.
Click Download printable version to save offline and share with team members.
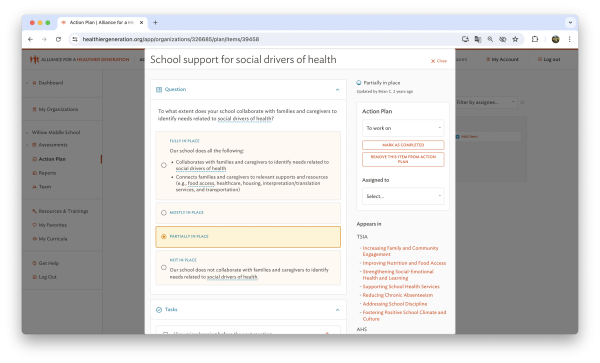
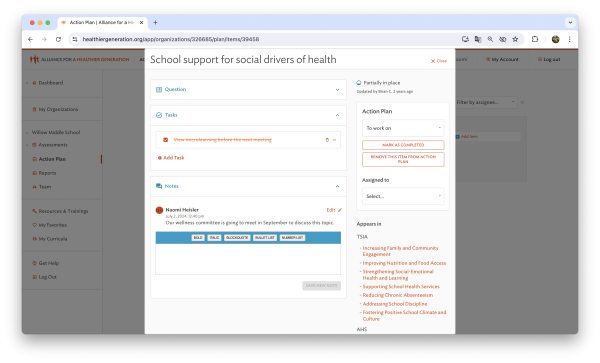
Action Plan Item Detail Page
Each Action Plan item has a detail page. Here you can:
- Access resources related to the item
- Add tasks for the item
- Add notes for the item
- Identify staff roles who should be involved in working on an item
- Invite a team member
- Change the item’s category
- Mark the item complete
- Remove the item from the Action Plan
If you have any questions about the Action Plan, please contact our Member Engagement & Support Team.